Dimensional metrology as the name suggests, measures the size and indirectly, the shape of your parts. Features such as radius, diameter, straightness, length, spacing, and position, are inspected with dimensional metrology.
Measurements in dimensional metrology can be made using a number of methods, including:
- Tactile, or contact measurement. A probe that contacts the surface of the part moves a transducer which provides a measured value.
- Pneumatic. A precision air orifice or channel is placed a short distance from the surface of the part and the rate of flow or backpressure is used to measure the part feature.
- Optical. Light is used to record each data point. Optical metrology systems include laser triangulation, optical comparator, and structured light systems.
Both pneumatic and optical dimensional metrology systems are considered to be “non-contact” metrology. However, part fixtures and tooling may contact the part at some point during the measurement.
When choosing a gauge for your dimensional metrology needs, it’s important to consider the advantages and disadvantages of each method.
Pneumatic metrology is robust and durable, being resistant to dirt, oil, and other contaminants. These features make it well suited for many heavy manufacturing environments. Pneumatic gauging also enjoys a very high resolution and accuracy. Its disadvantage is that the air orifice acts as a mechanical filter, reducing the ability to check features like roundness or chatter.
Tactile metrology can be very fast and accurate. As the name “tactile” suggests, it uses contact probes that touch the part surface for measurement. A tactile system when properly constructed does not suffer from the innate filtering that is present in a pneumatic system. Where cycle time is important to your dimensional metrology application, a dedicated fixture gauge can be used. With fixture gauging, tactile probes can be placed at each critical feature location, for fast measurement.
Tactile methods can also take the form of a CMM where a single probe is moved to each feature of the part, or the part is rotated in front of the probe (cylindrical CMM). These systems are slower but more flexible than a dedicated fixture gage. While less robust than pneumatic methods, tactile gauges still function well where the part may have limited contamination. Disadvantages of tactile gaging include possible marking of soft surfaces and wearable probes due to repeated contact with the surface.
Optical metrology does not contact the part surface, making it ideal for parts like medical implants, that cannot bear a witness mark. Optical methods can also be very fast when measuring multiple points. There are too many variations of optical measurement technology to elaborate on each type within the scope of this post. However, a brief list of optical technologies used in dimension metrology would include:
- Optical Comparators use a light source behind the part, to cast a shadow on a frosted glass panel, or camera system. A scale on the glass shows dimensional information, or a pattern is discerned from reading the individual pixels of the camera. A variation on the optical comparator is the optical shaft gage, which rotates the part between an LED light source and a camera detector. By recording the index positions of each measurement, a 360-degree view of the part can be obtained.
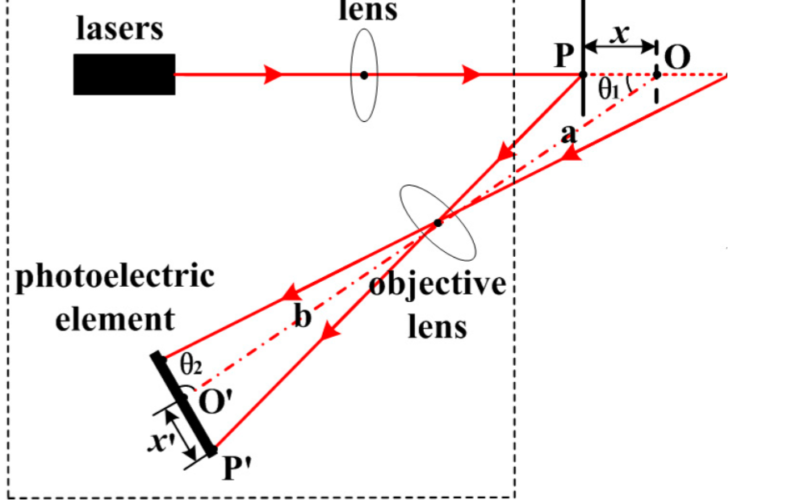
- Laser Triangulation uses a laser beam directed at the feature to be measured. The beam is reflected back to a detector or camera placed at a known angular offset. The location where the returned beam strikes the sensor changes as the target feature moves closer or farther from the laser unit. Simple trigonometry allows this distance to be computed.
- Structured Light systems project a light pattern (actually, many of them) onto the part surface. This pattern is distorted as it passes over the part features. Cameras are placed at known distances and the distortion in the light pattern is recorded, creating a point cloud of information. Structured light metrology systems can use white light, infrared, or even a laser as the light source.
- Confocal Chromatic sensors focus polychromatic white light onto the part surface through multiple inline lenses. The lenses are arranged in such a way that the white light is dispersed into a monochromatic light by controlled chromatic deviation. A certain deviation is assigned to each wavelength by a factory calibration. The wavelength that is exactly focused on the part feature is used for the measurement.
The application requirements for accuracy and the range-of-measurement window, determine which dimensional measurement technology will be used. Optical metrology methods often have a trade off in range vs precision. As a general rule of thumb, optical methods can be very accurate over very short measurement ranges or less so over large ones.
In conclusion, the solution to your Dimensional Metrology requirement must be a carefully balanced approach. Major Gage offers inspection systems using a combination of tactile and optical metrology methods. If we don’t have a solution for you, we can suggest an industry expert in each technology to help you better make your buying decision.

