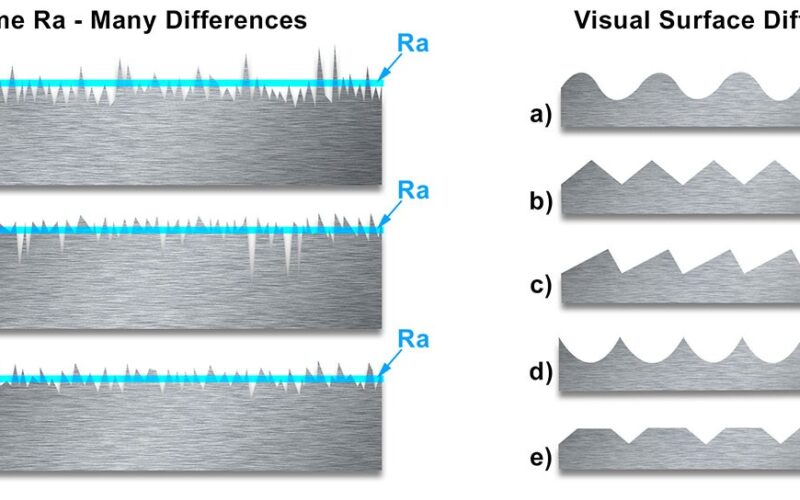
To measure Ra, you need a profilometer. If you only need Ra, then a skidded profilometer is the cheapest way to do it. This device features a stylus (a tiny point made of carbide, sapphire, or another hard material) that moves over the surface, capturing the height differences between the peaks and valleys. Specific to a skidded profilometer (aka roughness tester) is a small pad is placed next to or around the stylus. The pad acts as a mechanical filter to remove the long wavelengths (waviness), leaving only the short wavelengths that makeup roughness.
We have an excellent recommendation if you need a budget surface roughness tester for Ra, here.
The Ra value measures, in micrometers or microinches, the average of all peaks and valleys indicating deviations from the mean line throughout the entire surface of a sample length. Higher values indicate a rough surface, while lower numbers indicate a smooth surface.
The term CLA (Center Line Average) is often used interchangeably with Ra in ISO standards, referring to the same concept of surface roughness measurement.
A skidded profilometer can also measure these parameters:
Rz, Rq, Rt, Rp, Rv, R3z, R3y, RzJIS, Rsk, Rku, Rsm, Rmr, Rx, RPc, Rk, Rpk, Rvk, Mr1, and Mr2
If you are measuring Ra, then Rz is another useful parameter. The vertical distances of the five highest peaks and five lowest valleys are taken from five sampling lengths. These distances are then averaged to indicate the Rz value, measured in micrometers or microinches.
Why Surface Smoothness Matters
Surface smoothness isn’t just about aesthetics; it’s about performance and functionality. Surfaces that are too rough can lead to increased friction, wear, and ultimately, premature failure of parts. Moreover, in high-purity environments, smoother surfaces prevent material buildup and contamination, making cleaning more effective and less time-consuming.
Decoding Surface Roughness Measurement
Surface roughness involves analyzing the microscopic peaks and valleys across a surface. Here’s how it’s usually done:
- Measurement Metrics: Ra (Roughness Average) is the most common measure, calculated as the average height deviations across the surface. Other parameters include Rq (RMS), Rz (the difference between the highest peak and lowest valley), and Rq (root-mean-square deviation), each offering different insights into the surface’s texture.
- Measurement Standards: Ra is defined according to ASME B46.1 as the arithmetic average of absolute profile height deviations. This standard helps ensure consistency and accuracy in measurements.
The Significance of Ra in Manufacturing
A smooth surface is more than just visually appealing; it has significant implications in manufacturing:
- Product Quality: Smooth surfaces reduce the risk of contamination and facilitate easier cleaning, crucial in high-purity manufacturing.
- Efficiency: Less surface roughness means less material stickiness, leading to faster cleaning and shorter downtime between batches, which enhances productivity.
Surface Roughness vs. Surface Finish
It’s important to distinguish between surface roughness and surface finish:
- Objective vs. Subjective: Surface finish often refers to the visual and tactile quality of a surface, which can be subjective. Surface roughness, on the other hand, is quantitatively measured using instruments like profilometers, providing objective data on surface texture.
Navigating Different Surface Finishes
Various finishes offer different levels of roughness:
- From Rough to Smooth: Surface finishes vary widely, from the very rough HRAP to the nearly flawless #8 finish, each suited to different applications based on the required functionality and aesthetic appeal.
Measuring Challenges and Considerations
Accurate measurement of surface roughness requires attention to detail:
- Setting the Right Parameters: Correct measurement setup is crucial, including selecting the appropriate cutoff length to differentiate between roughness and waviness, ensuring the accuracy of Ra readings.
Conclusion
Measuring Ra is essential in assessing and controlling the quality of manufactured parts. By understanding the tools, techniques, and significance of surface roughness measurement, manufacturers can improve product performance, reduce the risk of contamination, and enhance efficiency. Whether you’re dealing with high-purity processes or aiming for optimal mechanical performance, getting surface roughness right is key to success.

