Do you need to precisely measure surface finish? For inspection purposes, engineers and quality inspectors rely on a device known as a profilometer, also known as a roughness tester. In this article, we will explain profilometers, and the types of roughness testers, highlighting their advantages and limitations.
What is a Profilometer and Why Do We Use One?
A profilometer is an instrument specifically designed to measure the profile and surface finish of a given surface. Surfaces, on a microscopic scale, are composed of a series of peaks and valleys with varying height, depth, and spacing. These subtle differences in surface features determine crucial aspects such as texture, appearance, and functionality, whether a surface feels smooth or rough, appears matte or glossy, forms a seal effectively, or is suitable for use as a wear surface. In industries where mechanical parts are produced, surface roughness or surface finish requirements are commonly specified on the part drawing, and profilometers play a critical role in verifying compliance with these specifications.
Types of Profilometers and Roughness Testers
Profilometers come in various shapes and sizes, broadly categorized into two types – tactile (contact), and optical (non-contact).
Tactile Profilometers
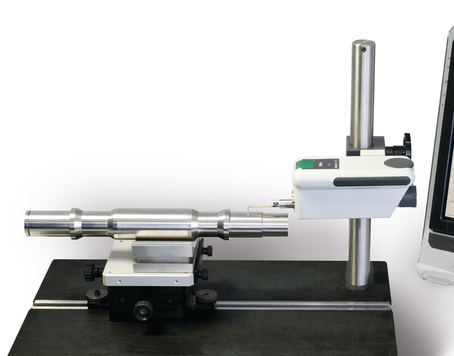
Tactile, or “contact” profilometers (sometimes called Stylus Profilometers) operate by physically tracing the surface with a stylus. This stylus typically has a point contact with a 2 um (~.000080”), 5 um (.000200”), or 10 um radius. The stylus lightly drags across the surface, registering changes in height as it moves over peaks and valleys. The measurements are then tracked against the position, creating a detailed profile. These instruments are commonly found in machine shops for measuring surface finish on machined parts.
Key points about tactile profilometers:
- They are not as sensitive to dirt and oil compared to optical profilometers.
- Their accuracy is not affected by surface optical characteristics.
- However, they may create scratches in soft materials and require periodic replacement of stylus tips.
Optical Profilometers
Optical, or “areal” profilometers utilize light reflections to measure surface features. These devices can be further categorized into 1-D, 2-D, and 3-D profiling devices, each employing various principles such as optical interference, confocal apertures, focus detection, and pattern projection.
An ”areal” measurement refers to measurement across an area, rather than a straight line, as is the case with a tactile instrument. Areal specifications generally start with an “S”, for example, Sa is the areal approximation of the traditional Ra measurement. Both refer to the average roughness across their inspection paths.
Key points about optical profilometers:
- Optical profilometers offer faster measurement due to the use of light
- Have the ability to collect millions of readings within seconds, enabling the modeling of large surface areas.
- Require surfaces to reflect light accurately and may face challenges with translucent or highly reflective surfaces.
Profilometer Selection
Selecting the appropriate profilometer for a specific application involves several considerations:
- Identifying the parameters to be measured, their range, and required accuracy.
- Considering the size and shape of the surface to be measured.
- Evaluating the number of measurements and cycle time required for each measurement.
- Considering if an areal measurement is appropriate if a tactile specification is called out. Tactile or traditional parameters are measured in a straight path.
There is no one-size-fits-all solution; the selection process varies depending on the application. For instance, a machine shop dealing with large parts may opt for a handheld contact profilometer, while a semiconductor manufacturing plant may integrate an optical profilometer into its processing line or inspection cell.
Profilometer Brands
Some commonly available profilometer brands include:
- Mitutoyo (Contact and Optical Profilometers)
- Mahr (Stylus Profilometers)
- Taylor-Hobson (Contact Profilometers)
- Bruker (Contact and Optical Profilometers)
- Zygo (3D Optical Profilometers)
- Polytec (Optical Profilometers)
Takeaway Points About Profilometers:
- Profilometers are essential tools for measuring surface roughness or surface finish.
- Contact Profilometers use a stylus to measure one point at a time, offering robustness and ease of use.
- Optical Profilometers utilize reflected light for measurement, often enabling the simultaneous measurement of multiple points.
- When selecting a profilometer, ensure it aligns with the specific measurement range and features required for your application.
By understanding the distinctions and operating principles of various profilometers, engineers and quality inspectors can make informed decisions to ensure accurate surface measurements in their respective fields.
When you are ready to buy a Stylus profilometer, we can provide expert advice for YOUR parts and process! Fill out the contact form and our Profile and Roughness Knowledge Expert will contact you. Your information will not be used for any other purpose and will not leave our secure servers without your permission. If you’d rather just email us, you can do so at MajorGageMail@gmail.com

